Sunday, June 5, 2016
Saturday, June 4, 2016
baby dragon

Baby dragon pasukan terbaru dari clash of clans dengan jenis serangan bola api yang terlontar dari mulutnya
pasukan udara ini cukup kuat dalam menahan serangan dari senjata lawan walau hanya dengan kekuatan dan kapasitas maupun biaya pembuatanya setengah dari dragon.
pasukan baby dragon baru bisa dibuka pada town hal 9 di barak level 11 kombinasi pasukan yang bisa di jadikan alternatif serangan bila ada celah kelemahan pada pertahanan udara dari lawan.
Friday, June 3, 2016
Wednesday, June 1, 2016
Monday, May 30, 2016
Town Hall 3 Starter

Town hall level 3 adalah level awal dari sebuah permainan clash of clans yang sangat terkenal bagi sebagian orang untuk memulai permainan setarategi ini mungkin sedikit agak membingungkan namun sebenarnya ini sangatlah mudah karna pada sesi awal kita memainkannya sudah ada sedikit arahan dari bude pemandu,
baiklah untuk townhal level 3 ini kita sudah memiliki shield atau pelindung yang membuat desa kita tidak akan di serang oleh pasukan dari desa yang lain dan inilah saatnya kita mempersiapkan desa kita dari berbagai macam serangan.
note: masukan aja pada saat awal sesi perkenalan kita akan di bimbing untuk menggunakan gems yang berwarna hijau ada pojok kanan atas sebaiknya jangan di gunakan biarpun cuma satu cobalah kita berhemat untuk yang satu ini agar gems cepat terkumpul untuk membeli builder karna semakin level kita tinggi tiap upgrade akan memakan biaya dan waktu yang semakin besar dan lama
dan saat ini fasilitas yang kita punya adalah:
gold storge lvl 1
elixir storge lvl1
canon lvl 1 (2 buah)
archer tower lvl 1
gold mining lvl 1 (2 buah)
elixir colector lvl 1 (2 buah)
barack lvl 1 (2 buah)
builder (2 buah)
army camp lvl 1
dan karna kita masih dalam mode shield selama 3 hari jangan digunakan untuk menyerang desa lain karna shield kita nanti akan terpotong maka kita bisa serang desa goblin untuk sementara waktu sambil mengumpulkan gold dan elixir untuk membangun desa, karna builder kita hanya dua maka kita harus optimalkan pengerjaan pembangunan desa kita untuk langkah pertama upgrde gold dan elixir storage dari kapasitas 2000 menjadi 4000 yang di lanjutkan dengan mengupgrade camp army level 1 ( kapasitas 20 pasukan) menjadi level 2 ( kapasitas 25 orang) dan teruskan langkah ini sampai max level pada th3 ( town hall3).
pada saat menyerang desa goblin usahakan prajurit yang kita turunkan sedekat mungkin dengan senjata lawan agar yang diserang lebih dulu adalah senjatanya dan prajurit yang kita punya baru barbarian lvl 1
barbarian : tipe penyerang apa saja yang berada di dekatnya
jangan terburu-buru dalam mengupgrade townhall lebih baik upgrade penyimpnan, pertahanan dan penyerangan sebelum kita upgade ke townhall4 karna nanti kita yang akan repot sendiri dalam menghadapi lawan, kenapa saya menekankan untuk upgrade penyimpanan terlebih dahulu karna kapasitas penyimpanan kita adalah tolak ukur kekayaan desa kita bila nanti desa kita diserang persentase kecurian dari lawan kita jadi lebih kecil cape kan klo udah ngumpulin sedikit2 eh kecurianya banyak nyesek....
dan yang kedua adalah penyerangan dalam hal ini level barack level pasukan dan level army camp lebih di dahulukan agar penyerangan yang kita lakukan ke desa lain bisa lebih maksimal dan yang terakhir adalah pertahanan karna untuk pertahanan adalah bagian yang merepotkan karna kebanyakan biaya upgrade mahal dan makan waktu lama,
dan yang tak kalah penting adalah memperbaiki clan castle yang rusak biayanya cukup mahal 10000 gold dan bila clancastle sudah kita perbaiki kita bisa mencari dn bergabung dengan clan dari desa lain dan ini akan sangat membantu karna kita bisa minta bantuan pasukan dari rekan satu clan kita sukur-sukur pasukanya yang levelnya sudah tinggi ini akan sangat memudahkan kita dalam menyerang desa lain atau menjaga desa kita dari serangan musuh kalau bingung cari clan yang cocok boleh join di clan saya Royal Jawara kita akan sangat senang sekali bisa membantu sesama clasher yang mau membangun desa
teknik serangan.
melakukan penyerangan baik itu ke desa goblin maupun ke desa musuh sebenarnya bagi saya sendiri cukup menggunakan barbarian saja yang terpenting dimana kita menurunkan pasukan barbarian dan posisi peletakan pasukan yang bagus itu sedekat mungkin dengan artileri pertahanan lawan yang paling berat yaitu mortar karna kerusakan yang ditimbulkan masiv atau menyebar dan bila segerombolan barbarian terkena mortar maka keseluruhan gerombolan tersebut terkena dampaknya sedangkan canon dan archer tower bisa memberikan kerusakan lebih besar pada satu pasukan diantara gerombolan barbarian
kelemahan mortar adalah jangkauan pendek dimana dia tidak bisa menyerang bila pasukan sudah terlalu dekat,
yang paling mudah adalah dengan menurunkan pasukan clan castle yang berisi pasukan udara dengan kapasitas 10 orang clan castle bisa di isi
- baloon isi 2
- minion isi 5
lebih bagus lagi bila level pasukanya juga tinggi.
sementara sampai disini dulu nanti disambung lagi selamat berjuang membangun desa
Red
Royal Jawara Leader
Laborat upgrade

| 
| 
| 
|
| Level 1 | Level 2 | Level 3 | Level 4 |

| 
| 
| 
| 
|
| Level 5 | Level 6 | Level 7 | Level 8 | Level 9 |
- Summary
- The Laboratory is the facility where you go to upgrade your Troops and Spells. For a single research fee of Elixir or Dark Elixir, a chosen unit's health, damage and cost will increase by a small amount.
- If you decide to upgrade your Laboratory while there's a research going on, it will continue the research progression. If you happen to be logged on when the lab upgrade completes, it may appear that the upgrade picks up where it left off. Log out and back on to see your troop upgrade progress reach its proper progress level.
- You cannot cancel the research while it is in progress, but you can immediately complete the upgrade (usually for a rather substantial amount of Gems).
- Laboratories emit a purple (level 1-6), blue (level 7), red (level 8) or yellow (level 9) glow from the entrances when upgrading troops or spells.
- You do not need an available builder to upgrade troops or spells.
- Different levels of Troops will receive graphical changes. However, when you are upgrading a troop, the laboratory interface doesn't show what it looks like after the upgrade.
- Upgrade Differences
- Laboratories undergo significant visual changes at levels 2, 3, 6, 7, 8 and 9.
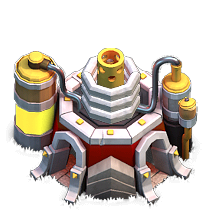
- When initially constructed, the Laboratory consists of a wooden octagonal structure with multiple door-less entrances. A mass of black tubing covers the center of the Laboratory's roof.
- At level 2, the Laboratory adds a large vat of Elixir mounted on one side, while the roof is reinforced with steel. A dial is on the vat of elixir, and wires connect it to the roof, near the black tubing.
- At level 3, the Laboratory's roof adds a large black dome with circular Elixir-colored ports.
- At level 4, the doorways receive gold trim.
- At level 5, a second Elixir vat is added to the left wall.
- The level 6 Laboratory receives a faceted crystal sphere on its roof supported by a black iron rod and a helical golden spring. Electricity periodically runs up the surface of the sphere.
- At level 7, the crystal sphere is replaced by a huge set of stacked circular gold rings, identical to those found atop the level 7 Hidden Tesla. The Elixir vat on the left side of the Laboratory is replaced with a larger one filled with Dark Elixir. The ringed structure on the roof crackles periodically with electricity.
- At level 8, the circular gold rings are replaced with a vertical tube glowing from the inside. This tube is emblazoned with what appears to be the symbol representing radioactive material, which indicates that the liquid is likely radioactive. The door posts turn to a dark red color. It seems that red fluid is filling the left chamber. The dial also starts moving back and forth rapidly, showing that the vat may be overflowing. During a troop upgrade, the vertical tube spews fire.
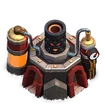
- At level 9, the stack of rings are re-added to the top of the Laboratory, instead this time the rings are white not gold. The door post turns from a dark red to white. The red fluid on the left side is changed to yellow.
- Laboratories undergo significant visual changes at levels 2, 3, 6, 7, 8 and 9.
- Trivia
- Although a particular troop or spell may be listed in the table below as being available to upgrade at a particular Laboratory level, only those you have previously unlocked (with the appropriate level Barracks, Dark Barracks or Spell Factory) will actually appear in the upgrade interface. For instance, the level 2 Lightning Spell is available in the level 1 Laboratory, but the Lightning Spell itself is not unlocked until the Spell Factory is built. Once the Spell Factory is constructed, you will be able to upgrade the Lightning Spell as high as your current Laboratory allows.
- Heroes cannot be upgraded in the Laboratory.
- The conductor on top of the Lab on levels 6 and 7 depicts the 'lightning gatherer' that is used to raise the dead creatures to life that are often found in horror movies.
- The conductor on top of the level 7 Laboratory may be an imitation of the level 7 Hidden Tesla.
- The tubes on the either side of the level 7 lab seem to hold Dark Elixir.
- The pressure gauges on the side Dark Elixir vats are only seen moving on the level 7 and 8 Laboratory, except for when troops/spells go under upgrade. Then, all laboratory gauges move.
- The Laboratory, along with Mortar, are currently the only two buildings that can only be upgraded once in every Town Hall level starting from Town Hall 3 to Town Hall 11.
- The phrase: "Harder, better, faster, and stronger!" is a reference to the French dance duo; Daft Punk's widely known song, Harder Better Faster Stronger.
- None of the troops increase in speed when upgraded. However, upgrading the Rage Spell and Haste Spell in the Lab will produce more speed boosts, which justifies the word "faster".
- The Lab may influence the appropriate Town Hall level's design, as the Level 7 Lab (TH 9) has a dark theme, the Level 8 Lab (TH 10) has a lava theme, and the level 9 Lab (Town Hall 11) has a white, red and yellow theme. This could also be vice versa (the TH influences the lab).
- The Laboratory, the Town Hall and the Eagle Artillery are the only three buildings in the game to take up a 4x4 grid space.
Icon Descriptions
| Tapping this icon displays information about the Laboratory, such as Level and Hitpoints. | |
| Tapping this icon begins upgrading the Laboratory to the next level, if you have enough resources and a free Builder. When the Laboratory is at maximum level, this icon is not shown. | |
| Tapping this icon, which is displayed only while an upgrade is in progress, instantly finishes that upgrade at the cost of the displayed number of Gems. | |
| Tapping this icon, which is displayed only while an upgrade is in progress, cancels the current upgrade and refunds half of the upgrade cost. | |
| Tapping this icon opens up the Laboratory interface, allowing you to upgrade your troops' levels. | |
| Town Hall Level | 1 | 2 | 3 | 4 | 5 | 6 | 7 | 8 | 9 | 10 | 11 |
|---|---|---|---|---|---|---|---|---|---|---|---|
| Number Available | 0 | 0 | 1 | 1 | 1 | 1 | 1 | 1 | 1 | 1 | 1 |
| Size |
|---|
| 4x4 |
| Level | Hitpoints | Build Cost | Build Time | Experience Gained | Town Hall Level Required |
|---|---|---|---|---|---|
| 1 | 500 | 25,000 | 30 minutes | 42 | 3 |
| 2 | 550 | 50,000 | 5 hours | 134 | 4 |
| 3 | 600 | 90,000 | 12 hours | 207 | 5 |
| 4 | 650 | 270,000 | 1 day | 293 | 6 |
| 5 | 700 | 500,000 | 2 days | 415 | 7 |
| 6 | 750 | 1,000,000 | 4 days | 587 | 8 |
| 7 | 830 | 2,500,000 | 5 days | 657 | 9 |
| 8 | 950 | 4,000,000 | 6 days | 720 | 10 |
| 9 | 1,070 | 6,000,000 | 7 days | 777 | 11 |
Upgrade Chart
The following charts lists the level of the laboratory on the top and the unit/spell you can upgrade on the left. Each cell contains the level of the unit/spell you can train, how much it costs in elixir, and how long it takes. For example, Laboratory level 4 allows you to upgrade your Giants to level 3 for 250,000 elixir and it takes 2 days. The top chart contains Elixir troop upgrades while the bottom chart contains Dark Elixir upgrades. Certain troops and spells don't have new levels unlocked at certain laboratory levels and are represented by ' - 's. For example, there's no new level of Goblin unlocked at Laboratory level 2, however you can upgrade it from level 1 to 2 with a level 2 (or higher) Laboratory if you didn't upgrade it when you had a level 1 Laboratory.| Upgrade Chart | Laboratory Level | |||||||||
| Level 1 | Level 2 | Level 3 | Level 4 | Level 5 | Level 6 | Level 7 | Level 8 | Level 9 | ||
|---|---|---|---|---|---|---|---|---|---|---|
| Barbarian | Level | 2 | - | 3 | - | 4 | 5 | 6 | 7 | - |
| Cost | 50,000 | - | 150,000 | - | 500,000 | 1,500,000 | 4,500,000 | 6,000,000 | - | |
| Time | 6 hours | - | 1 day | - | 3 days | 5 days | 10 days | 14 days | - | |
| Archer | Level | 2 | - | 3 | - | 4 | 5 | 6 | 7 | - |
| Cost | 50,000 | - | 250,000 | - | 750,000 | 2,250,000 | 6,000,000 | 7,500,000 | - | |
| Time | 12 hours | - | 2 days | - | 3 days | 5 days | 10 days | 14 days | - | |
| Goblin | Level | 2 | - | 3 | - | 4 | 5 | 6 | 7 | - |
| Cost | 50,000 | - | 250,000 | - | 700,000 | 2,250,000 | 4,500,000 | 6,750,000 | - | |
| Time | 12 hours | - | 2 days | - | 3 days | 5 days | 8 days | 10 days | - | |
| Giant | Level | - | 2 | - | 3 | 4 | 5 | 6 | 7 | - |
| Cost | - | 100,000 | - | 250,000 | 750,000 | 2,250,000 | 6,000,000 | 7,000,000 | - | |
| Time | - | 1 day | - | 2 days | 3 days | 5 days | 10 days | 14 days | - | |
| Wall Breaker | Level | - | 2 | - | 3 | 4 | 5 | - | 6 | - |
| Cost | - | 100,000 | - | 250,000 | 750,000 | 2,250,000 | - | 6,750,000 | - | |
| Time | - | 1 day | - | 2 days | 3 days | 5 days | - | 10 days | - | |
| Balloon | Level | - | 2 | - | 3 | 4 | 5 | 6 | - | 7 |
| Cost | - | 150,000 | - | 450,000 | 1,350,000 | 2,500,000 | 6,000,000 | - | 9,500,000 | |
| Time | - | 1 day | - | 2 days | 3 days | 5 days | 10 days | - | 14 days | |
| Wizard | Level | - | - | 2 | 3 | 4 | 5 | - | 6 | - |
| Cost | - | - | 150,000 | 450,000 | 1,350,000 | 2,500,000 | - | 7,500,000 | - | |
| Time | - | - | 1 day | 2 days | 3 days | 5 days | - | 14 days | - | |
| Healer | Level | - | - | - | - | 2 | 3 | 4 | - | - |
| Cost | - | - | - | - | 750,000 | 1,500,000 | 3,000,000 | - | - | |
| Time | - | - | - | - | 3 days | 5 days | 7 days | - | - | |
| Dragon | Level | - | - | - | - | 2 | 3 | 4 | 5 | - |
| Cost | - | - | - | - | 2,000,000 | 3,000,000 | 7,000,000 | 8,000,000 | - | |
| Time | - | - | - | - | 7 days | 10 days | 14 days | 14 days | - | |
| P.E.K.K.A | Level | - | - | - | - | - | 2 / 3 | - | 4 / 5 | - |
| Cost | - | - | - | - | - | 3,000,000 / 6,000,000 | - | 7,000,000 / 8,000,000 | - | |
| Time | - | - | - | - | - | 10 days / 12 days | - | 14 days / 14 days | - | |
| Baby Dragon | Level | - | - | - | - | - | - | 2 | 3 | 4 |
| Cost | - | - | - | - | - | - | 6,000,000 | 7,000,000 | 8,000,000 | |
| Time | - | - | - | - | - | - | 10 days | 12 days | 14 days | |
| Miner | Level | - | - | - | - | - | - | - | 2 | 3 / 4 |
| Cost | - | - | - | - | - | - | - | 7,500,000 | 8,500,000
/
9,500,000 | |
| Time | - | - | - | - | - | - | - | 10 days | 12 days / 14 days | |
| Lightning Spell | Level | 2 | 3 | 4 | - | - | 5 | 6 | 7 | - |
| Cost | 200,000 | 500,000 | 1,000,000 | - | - | 2,000,000 | 6,000,000 | 8,000,000 | - | |
| Time | 1 day | 2 days | 3 days | - | - | 4 days | 10 days | 14 days | - | |
| Healing Spell | Level | - | 2 | - | 3 | 4 | 5 | 6 | - | - |
| Cost | - | 300,000 | - | 600,000 | 1,200,000 | 2,400,000 | 4,800,000 | - | - | |
| Time | - | 1 day | - | 2 days | 3 days | 5 days | 7 days | - | - | |
| Rage Spell | Level | - | - | 2 | 3 | 4 | 5 | - | - | - |
| Cost | - | - | 450,000 | 900,000 | 1,800,000 | 3,000,000 | - | - | - | |
| Time | - | - | 2 days | 3 days | 5 days | 7 days | - | - | - | |
| Jump Spell | Level | - | - | - | - | 2 | - | - | 3 | - |
| Cost | - | - | - | - | 3,000,000 | - | - | 6,000,000 | - | |
| Time | - | - | - | - | 5 days | - | - | 7 days | - | |
| Freeze Spell | Level | - | - | - | - | - | - | - | 2 / 3 / 4 / 5 | - |
| Cost | - | - | - | - | - | - | - | 4,000,000 / 5,000,000 / 6,500,000 / 8,000,000 | - | |
| Time | - | - | - | - | - | - | - | 5 days / 7 days / 10 days / 14 days | - | |
| Clone Spell | Level | - | - | - | - | - | - | - | 2 | 3 / 4 |
| Cost | - | - | - | - | - | - | - | 5,000,000 | 7,000,000 / 9,000,000 | |
| Time | - | - | - | - | - | - | - | 8 days | 10 days / 14 days | |
| Upgrade Chart | Laboratory Level | ||||||||
| Level 5 | Level 6 | Level 7 | Level 8 | Level 9 | |||||
|---|---|---|---|---|---|---|---|---|---|
| Minion | Level | 2 | 3 / 4 | 5 | 6 | 7 | |||
| Cost | 10,000 | 20,000 / 30,000 | 40,000 | 100,000 | 140,000 | ||||
| Time | 5 days | 6 days / 7 days | 10 days | 12 days | 14 days | ||||
| Hog Rider | Level | 2 | 3 / 4 | 5 | 6 | - | |||
| Cost | 20,000 | 30,000 / 40,000 | 50,000 | 100,000 | - | ||||
| Time | 8 days | 10 days / 11 days | 12 days | 14 days | - | ||||
| Valkyrie | Level | - | 2 | 3 / 4 | 5 | - | |||
| Cost | - | 50,000 | 60,000 / 70,000 | 110,000 | - | ||||
| Time | - | 8 days | 10 days / 12 days | 14 days | - | ||||
| Golem | Level | - | 2 | 3 / 4 | 5 | - | |||
| Cost | - | 60,000 | 70,000 / 80,000 | 90,000 | - | ||||
| Time | - | 10 days | 12 days / 14 days | 14 days | - | ||||
| Witch | Level | - | - | 2 | - | 3 | |||
| Cost | - | - | 75,000 | - | 160,000 | ||||
| Time | - | - | 10 days | - | 14 days | ||||
| Lava Hound | Level | - | - | 2 | 3 | 4 | |||
| Cost | - | - | 60,000 | 70,000 | 150,000 | ||||
| Time | - | - | 10 days | 12 days | 14 days | ||||
| Bowler | Level | - | - | - | 2 | 3 | |||
| Cost | - | - | - | 120,000 | 200,000 | ||||
| Time | - | - | - | 10 days | 14 days | ||||
| Poison Spell | Level | - | 2 | 3 | 4 | - | |||
| Cost | - | 25,000 | 50,000 | 75,000 | - | ||||
| Time | - | 4 days | 6 days | 10 days | - | ||||
| Earthquake Spell | Level | - | 2 | 3 | 4 | - | |||
| Cost | - | 30,000 | 60,000 | 90,000 | - | ||||
| Time | - | 6 days | 8 days | 12 days | - | ||||
| Haste Spell | Level | - | - | 2 | 3 / 4 | - | |||
| Cost | - | - | 40,000 | 80,000 / 100,000 | - | ||||
| Time | - | - | 8 days | 10 days / 14 days | - | ||||
Subscribe to:
Comments (Atom)